Showing posts with label trash to treasure. Show all posts

Tuesday, August 10, 2010

Wine Rack Towel Holder

I absolutely love the idea of using things for their unintended uses. Like plant stands for nightstands or end tables. Or topping a big pot with some wood/cement/door/whatever and make a really cool outdoor table. Door or shutters as a headboard. Sheets as window treatments, etc.

Well. Here is my new unintended use item:
Use an old wine rack as a towel holder
Yes. That would be a wine rack as a towel holder. See, before, my tub use to look like this -full of towels:
And thats not at its worst...at least this is somewhat organized....and the towels are folded :)

I used to have a basket under the sink for our towels. But, my husband could never remember they were there. I guess, out of sight out of mind. So, they migrated to the tub's edge. Which was fine cuz it was a cinch to just fold and throw them there. But it was an eyesore. Albeit, a behind the door eyesore. But I knew it was there.

And then I found this baby at the thrift store. For $3. And a light went off in my head.
It got itself a paint job and a new purpose in life....
Use an old wine rack as a towel holder
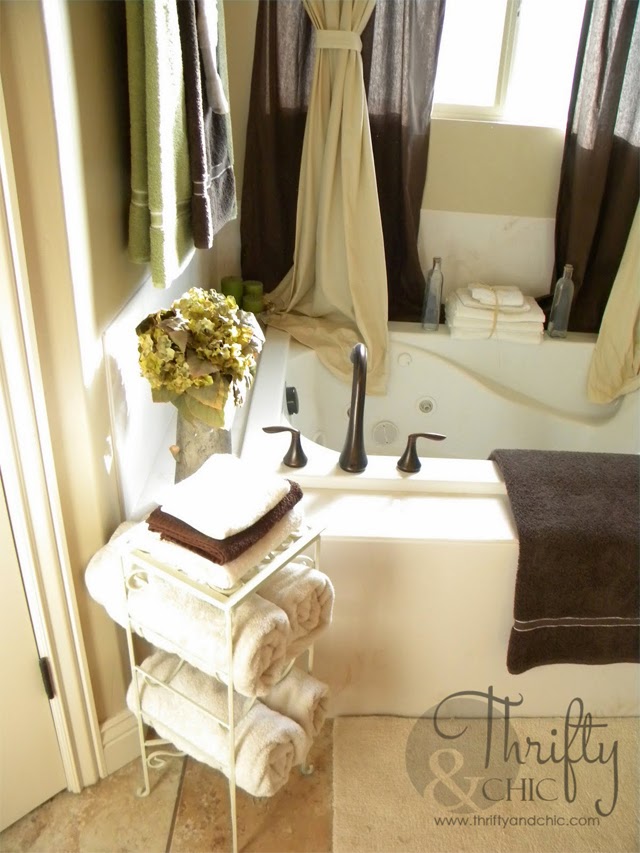
...to organize my towels.
I'm thinking that I like this new look...and it frees up the tub! Can't beat that.
Use an old wine rack as a towel holder


Read More

Wednesday, August 4, 2010

Matching Lamps....finally

Do you see what I see?
Yep. Over there in the left hand corner.
I'm all smiles.
As you know.
I found a lamp to match the one on the right but couldn't find the fabric to match.
I obviously found the fabric.

Here's what the lamp looked like before.
It was only $4:

And after:


I just followed the same steps I did with the other one and my burlap lamp, found here.

So, here it was in the beginning.
No painted furniture.
No matching night stands (not that they have to match, but anything would be better than my little table there)
And no matching lamp:

Here it was after the before.
With matching, painted night stands:
Getting better.
Right?

And now!

I'm totally liking it.
Now to just finish the rest of the room.
I'm sure eventually I'll get around to it.

Just from a different angle:
Here's the post, just in case, to making a super easy and cheap headboard, like mine.

So, here's another before.
Blaaaah:

And after:
Sorry for the crazy colored pictures.
It's rainy and cloudy here,
which apparently doesn't make for the best lighting when taking pics.

Stay tuned....
for more of my master bedroom makeover.
It may not come tomorrow,
but,
hopefully, it'll come soon.
Cuz i'm sick at looking at oak colored dressers.

Enjoy the rest of your summer!

Alicia


Read More

Monday, May 17, 2010

Drab to Fab Storage Crate

Hey everyone! I hope you all enjoyed your weekend.
Sorry I haven't posted in awhile...I've been uber busy with work, but it took me to Las Vegas, so can't complain now can I?

So, those of you who read my ramblings probably know that we had a dumbo builder who decided to skip out on the closets when building our house.
We don't have ANYclosets except the ones in the bedrooms.
So I have like no place to put half my stuff....zero zilch nada storage.
I can go on and on at how much better my life would be with at least ONE linen closet or coat closet, but I won't.
So, usually where the blankets should go, they don't go, cuz there isn't one.
So they usually end up stashed in a corner somewhere.
But then....
I found this old milk crate (I think its a milk crate?) for $2.
And now I have some cute storage for the blankets!
Yay!

It use to look like this~

I liked the white already and how it kind of looked old and used. And I was lazy and didn't want to go through the process of painting it :) Truth be told. Cuz I was just going to paint it white anyway.

Then I took some rope I found for a buck fifty and wrapped the pretty little thing up.

I just hot glued the ends on both sides so they would stay. I loooove how it looks on the side:

I used my Cricut to cut this out with vinyl. I'm thinking I might put some more on the side....if I ever get around to it. But for now....
I'm happy that my blankets aren't in a pile in the corner somewhere...they have a place to live :)


Linked Parties:
Alicia
Read More

Sunday, March 28, 2010

Decorative Bowls

Here is a super quick, cheap and easy project. I think the thing that took the longest was waiting for the paint to dry....and even in that case, I'm so impatient I can't wait 10 minutes for it to dry. And on that note, I absolutely hate when I have to do another coat...and yet another coat. I think that's why me and white paint have a love-hate relationship. It always turns out beautiful....but it takes stinkin' forever to get there...'know what I mean?

Anyway. I'm sure you thrifty girls see these kind of things all the time at the thrift store:

They are fine by themselves, I guess, but together....they are Beautiful and Wonderful and will actually find a place in your house.

Cute Bowls from thrifted bowels and candle stands!
Just spray paint the two pieces to your hearts desire, and superglue the candle stand to the bottom of the bowl. Its just as easy as that. Told ya'. (unless you want to try the stenciling, that'll take your patience Right Out the door)

And here's another one (just in case you need a little more inspiration)

This is half a before picture because the plate I was going to use is no longer with us. It met its demise while I was scrubbing the darn thing...yep, split right in two. But it was for the best, because then I found something better :)

Cute Bowls from thrifted bowels and candle stands!
An awesomely large bowl for $1!!!

I did the same steps as above...spray painted, attached the stand:

Cute Bowls from thrifted bowels and candle stands!
Added a little old world charm:

Cute Bowls from thrifted bowels and candle stands!
And voila!
Cute Bowls from thrifted bowels and candle stands!

I'm already on to making cake stands using this same method. Its just so easy and super cheap. Both decorative bowls cost me only $2 to do. Can't beat that.

Happy Creating!!!

Read More

Thursday, March 18, 2010

Vintage Embellished Books

I love books, I don't always love how they look. But I think books are perfect for decorating, either in a book shelf, on free floating shelves, on tables, under lamps, etc. and for reading of course.

They are just wonderful :)But, what do you do when you don't have pretty books and you want to display them somehow? Cover them up of course. You may remember these books that I recovered.

Well, here's another option. Decoupage them. Yep. Works beautifully. Here's what you need:

  • Books (of course)
  •  Decoupage medium
  • cutter 
  • coordinating paper
  •  any accessories you may want to add to them at the end.
Cut the paper to size of the book. Make sure the top is your priority for that is going to be the side that people see, you'll more than likely run out of paper because not all books are 6 inches on each side and 12 inches long.
On both top books I had to add an extra little strip of paper on the back, and on the big bottom one, I had to outline the book with a coordinating solid color then add the original paper I chose so it would fit.

FYI, If you want the distressed look, sand the paper on the edges before you decoupage the paper to the book, it works a lot better than trying to sand through the decoupage medium.

After you have the books covered and dried, embellish to your heart's desire. I used some drawer pulls and a little scrapbooking embellishments on mine.
Cover books with paper and embellish

cover old books with scrapbook paper and embellish!


Pretty huh? Totally better than the before. If you wish, you can also paint the book pages to match!
Read More

Friday, March 12, 2010

Burlap Covered Lampshade and Updated Lamp

So, I have concluded two things after finishing this project. One~spray adhesive and burlap do not go well together...you get wooly mammoth hands.
Two~Next lamp shade I redo is not going to be round, its half near impossible to wrap thick ribbon on the inside of it.

So, on to my project...
Yay! I.Found.A.Lamp!!! (oh, did I already give that away?). Finally!
Its been like forever in the making, but finally, here's my lamp redo :)

So, here was how it started out.
Nice, beautiful, $8, and very seventies....oh and totally not my style.

So, the base got the scrub down, the sanding, and the spraypaint.
The shade got beautified.
The nasty outdated seventies shade got ripped off.

I used the outer layer of the shade as my stencil on the burlap that was going to replace it.

Next, I used some spray adhesive to attach to the burlap.(ugh...worst thing ever...aka. wooly mammoth hands...not.fun,not.fun.at.all)

Finished off the edge with some jute, wrapped some ribbon around it and attached a few embellishments.

As for the base ~painted it white, although I'm still not sure if I should distress it or not. But after putting the shade on the base, I knew it definitely needed something else, I mean...this thing was soooo ugly not even a fresh coat of paint could really help it.
So, I decided to girl it up :)

I attached a cute little ribbon and a pertiful flower.

Although the hubs may disagree (he still hates the thing), I loooove it :)

And it has found a nice little place in our living room.....permanently (sorry babe)


And guess what! The light actually works :) woohoo!

So, I need to still clean up the inside a little bit if I choose to actually keep this on....but still, the darn thing works! Yay!


So after my million years months of searching for a decent, cute, and cheap lamp. I found one :) And it turned out beautifully.


Happy Creating!


And don't forget to join:
Kimm at Reinvented
Alicia
Read More