Showing posts with label Sewing. Show all posts

Sunday, July 4, 2010

DIY Textured Pillows

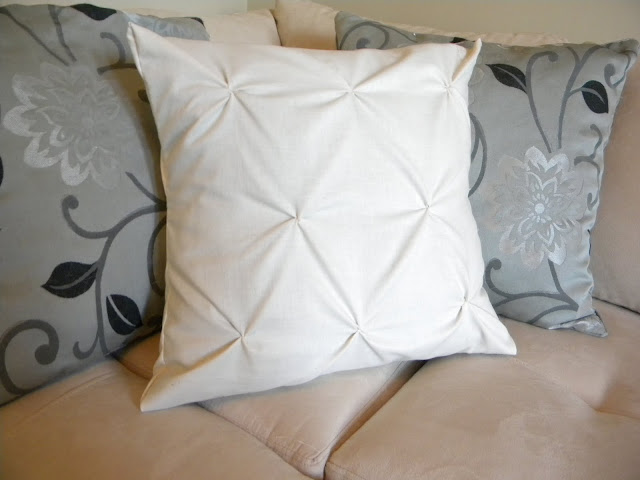
Ever swoon over textured pillows like these?
DIY Textured Pillow

Well. They are so super easy to make, so stop swooning :) They will only cost you the cost of the fabric. You can learn how to  make 10 minute pillow covers here.
And then.... 
  1. Turn the pillow cover inside out. 
  2. Mark with a fabric pen the areas you want the 'puckers'.
  3. Then pinch the fabric where you marked it.
  4. Get a needle and double thread it and knot the end of it.
  5. Pass the needle through your 'pinch' and wrap it around the pinch a few times, passing the needle through the pinch every once in a while.I did this about 4 or 5 times on each pinch.
  6. After you're done, pull the thread tight and knot it off.

Do this on every mark.


Now turn inside out again.
And your done!

DIY Pucker Pillow

I use to have lots of boring pillows lying around, so I pretty much took a needle and thread to every one of  them :)This one, we sit on and move around a lot, so its not in its best shape, but the puckers have stayed together!


Here's another one:
You can put as many pinches as you want as close together as you want, maybe only in a strip down the middle or on the side. Just depends on what look you're going for and how long you want to spend on it.

Update::
Here's another great project you can do using puckers! Make your own duvet cover just using some sheets and spice it up with this same technique :) Click here to see the tutorial.


Read More

Monday, April 26, 2010

Raise the Roof

Happy Monday! I hope y'all had a good weekend. Don't you just hate how fast they go by? Ugh.

So I decided to take my own advice....(which, by the way, I have done in every other room in our house, except this one, so don't get onto me)....and raise the curtains to the ceiling. As you all know....or should know....raising the curtains to the ceiling, especially in a small room, makes the room appear larger and taller and just all over more wonderful :) I also try to hang my window treatments wide, so it gives the illusion that the windows are that much larger too.

When we first moved in, I needed a quick fix for our front room's french doors. I had a curtain rod and some curtains from our old place, so I just threw them up so we could get some privacy. About a year later...they were still there. I loved them, but they bugged me every time I went into our front room, but I couldn't raise them higher without getting new window panels or freaking out by putting new holes in the wall, so they just stayed there:

I finally got the courage to make more holes in my walls and raise them up to the ceiling. I figured the panels would just cover the holes anyway. Right?Yeah...I love quick fixes :)

Since the panels were too short, I just added some fabric I got from Joanns to the bottom of the white (and  of course, Joanns was having a 50% off sale on their red tagged fabric, so as usual....I got more than I really needed. So that means, more sewing projects for me!)
With all the fixes, here's our front room today:

It totally makes the room look more grand. And it brought a whim of formality.

With adding the fabric to the bottom, I wasn't liking the tabs on the top ~it was just too casual, so I just folded them and secured them under to look like this:

 
This was sooo simple to do, I have done it with almost every window in our house, mainly because I hate sewing curtains....and this totally takes care of that.

I measured where I wanted the panels to hit the floor....and made sure both panels were exactly the same to match up the line where the white fabric stops and the blue begins.
I then folded the panel over, measured and secured it with cafe curtain rings:
To keep the pleated look all the way up to the top and so they wouldn't fall over, I secured the upper portion with a pin and bent it back towards itself (this totally could have been down with a safety pin...but I couldn't find any):
If you are going to do this....make sure each panel is identical, so you don't have one panel higher to the ceiling than the other...I think I measured my 'pinch' with the cafe curtain rings at about 2" from the top. It took me ohhhh about 4 or 5 times of putting the rod and curtains up, then taking them back down to get a perfect measurement. But it was worth it.

Yay! Now I can actually go and sit in the room and not stare sorely at the window treatments :)
Now....I'll stare happily :)

Here I did the same thing with just about six yards of fabric in our guest bedroom.
I hung these ones pretty wide, so I'll probably fill in the empty space with two more panels or some bamboo blinds:
These are the french doors in our dining room. I did the same thing with about six or seven yards of fabric...total no sew curtains.
Love it!
(don't mind the pheasant tail in the top corner....I guess its his house just as much as it is mine.......)

Read More

Thursday, April 15, 2010

"Sew" Easy 10 Minute Pillow Cover

Yay! Aren't you all glad that spring is finally here? At least around here it is....nice 70 degree weather. Love it!! And of course, guess what that means? My patio furniture finally gets to come up out of the dungeon basement and see the light of day :)

And that also means that I get to sew some new pillow covers for our outdoor pillows! Yay!!!
I love adding a new look to old things.

So...I've got my pillow (on sale from target last year...waited months and months and they finally got down below $3, so I bought 4), and Joanns was having a sale on their 'semi' outdoor fabric. So, I jumped and bought a yard of each.
10 minute 'sew' easy pillow cover
From my experience, one yard will make two pillow covers.
Step 1: Just cut straight down the middle of the yard (so 18" on both sides). Now each side will make a cover for a standard 16" square pillow:


Step 2: On the two short edges, fold over about 2 to 3 inches and pin in place:

Now stitch along where you just folded:

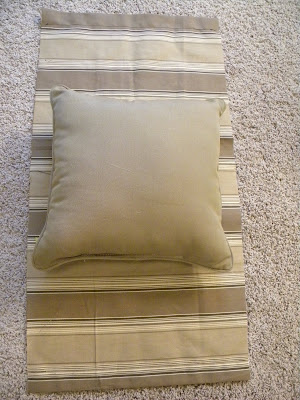
Step 3:Next, lay the piece down and put the pillow on top to make sure the dimensions on the side are correct; just in case your pillow isn't exactly 16". There should be about a 2 inch overlap of fabric as shown below:

Step 4: Foldthe fabric over the top of the pillow and eye where the next folds should be:

After eyeing the folds, fold both sides down and place the pillow on top to make sure the pillow will fit inside the case once it is stitched.  To make sure that the cover isn't too big or too small, check to see if there is about an inch or so of fabric around each edge:

Step 5: Once you get the measurements right, pin and stitch around the openings.
(and don't poke yourself....like I did....say about 5 or 6 times)

Step 6: Turn inside out and put the pillow inside.
And voila! A sewwwwww easy 10 minute pillow cover.


I am so going to be enjoying this patio today...tomorrow...and hopefully for the next few months unless this unpredictable weather has another snow storm planned for us....I think then I just might cry.

Once you get a hang of making these, you can cut the time in half. they are that easy to make :) Or if you have already made one, you can use that size as the template for the next ones so you don't have to keep on putting the pillow on top of the fabric to make sure of the right measurements. 

Happy Creating!


Read More