Showing posts with label curtains. Show all posts

Monday, April 26, 2010

Raise the Roof

Happy Monday! I hope y'all had a good weekend. Don't you just hate how fast they go by? Ugh.

So I decided to take my own advice....(which, by the way, I have done in every other room in our house, except this one, so don't get onto me)....and raise the curtains to the ceiling. As you all know....or should know....raising the curtains to the ceiling, especially in a small room, makes the room appear larger and taller and just all over more wonderful :) I also try to hang my window treatments wide, so it gives the illusion that the windows are that much larger too.

When we first moved in, I needed a quick fix for our front room's french doors. I had a curtain rod and some curtains from our old place, so I just threw them up so we could get some privacy. About a year later...they were still there. I loved them, but they bugged me every time I went into our front room, but I couldn't raise them higher without getting new window panels or freaking out by putting new holes in the wall, so they just stayed there:

I finally got the courage to make more holes in my walls and raise them up to the ceiling. I figured the panels would just cover the holes anyway. Right?Yeah...I love quick fixes :)

Since the panels were too short, I just added some fabric I got from Joanns to the bottom of the white (and  of course, Joanns was having a 50% off sale on their red tagged fabric, so as usual....I got more than I really needed. So that means, more sewing projects for me!)
With all the fixes, here's our front room today:

It totally makes the room look more grand. And it brought a whim of formality.

With adding the fabric to the bottom, I wasn't liking the tabs on the top ~it was just too casual, so I just folded them and secured them under to look like this:

 
This was sooo simple to do, I have done it with almost every window in our house, mainly because I hate sewing curtains....and this totally takes care of that.

I measured where I wanted the panels to hit the floor....and made sure both panels were exactly the same to match up the line where the white fabric stops and the blue begins.
I then folded the panel over, measured and secured it with cafe curtain rings:
To keep the pleated look all the way up to the top and so they wouldn't fall over, I secured the upper portion with a pin and bent it back towards itself (this totally could have been down with a safety pin...but I couldn't find any):
If you are going to do this....make sure each panel is identical, so you don't have one panel higher to the ceiling than the other...I think I measured my 'pinch' with the cafe curtain rings at about 2" from the top. It took me ohhhh about 4 or 5 times of putting the rod and curtains up, then taking them back down to get a perfect measurement. But it was worth it.

Yay! Now I can actually go and sit in the room and not stare sorely at the window treatments :)
Now....I'll stare happily :)

Here I did the same thing with just about six yards of fabric in our guest bedroom.
I hung these ones pretty wide, so I'll probably fill in the empty space with two more panels or some bamboo blinds:
These are the french doors in our dining room. I did the same thing with about six or seven yards of fabric...total no sew curtains.
Love it!
(don't mind the pheasant tail in the top corner....I guess its his house just as much as it is mine.......)


Read More

Friday, November 13, 2009

Bedroom updates

I think the small bedroom updates that I made created the perfect balance of needed winter warmth. Here's my bedroom in the summer....nice, light, and airy (especially when I have my light blue duvet cover on the bed):

Here's my bedroom now:

Updating the lamp was super easy. Here's the before:
And the after. Not much was done, I just added some ribbon with a hot glue gun. Buts its the small details that make a big difference.
I wasn't sure about adding the brown curtains on the side, but decided to go for it and see how it turned out. And it turned out absolutely lovely :) This was an easy no sew project and the fabric cost me close to nothing. It was about $2/yard. I used a little over 3 yards and just cut it right down the middle (one section for each side of the window). I folded over the top portion and secured sections of it with cafe rod rings and then loaded it onto the curtain rod. Did the same thing on the other side, and vola! Beautimas :)
Another chic and thrifty update was the headboard. This room transformation cost about $20; they were small changes that made a big difference and I absolutely love my room now :)
Read More

Saturday, July 18, 2009

Almost out of the fish bowl

Here are a few more windows that I recently covered:I thought the double curtain idea made an oasis for our jetted tub and brought much needed color into the area without having to paint.

Here's our kitchen window that I had to cover in point two seconds when neighbors finally moved into the house next door. These were just interim until our new blinds arrived, although I was kind of sad to see them go. These were uber easy to make. Just a couple yards of fabric, some ribbon and iron on seam tape. It probably took about 10 minutes to do (I got lucky because the bottom was already finished).

Here's the kitchen with our $100 wood blinds (ugh, to think I might have to cover my whole house in these). It looks good at least :)


Here they are opened. I love the light that this window allows in during the morning (although, do these blinds make my kitchen look like an office? I'm still on the fence with this one)


Read More

Friday, July 17, 2009

Living in a fish bowl

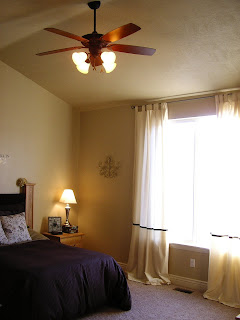
So, moving into a brand new house means that there are absolutely no window coverings. I mean none. So for the most part, we lived in a fish bowl for the first few weeks after we moved in. In desperation to get some window coverings up, I went shopping. As I was shopping, I realized that I was cheap. I mean really cheap. Who would spend upwards of $100 or even more on curtains? I have to cover at least 8 windows for sure (and that's only about half of them). $800? No way Jose. So I went to my favorite place to find cheap long window coverings. Ikea! I got two panels for like $15 on sale and they are 98" long. Perfect right? Wrong. I got home and found out that the top of my window is exactly 98" and we all know (or should know) you do not hang curtains right at the top of the window. You at least want to give it a few inches, if not more, on the top. I'm the kind of person who likes to hang the curtain rod right below the ceiling. It makes the room look that much larger and raises the height of the ceiling (figuratively speaking). Here's what I was going for in our bedroom:

The 9' ceiling line is right above the curtain rod, so the store bought curtains wouldn't do as you can see. Therefore, I used my creative ingenuity (cough cough), trekked myself down to the ol' fabric store and found the same exact fabric as the curtains for $1 a yard. I like the quick fix, so I used the iron on hem tape stuff and voila! Added just a little brown ribbon to hide the seam, and it lengthened my curtains by 10" letting them go from ceiling to a puddle on the floor in just about 30 minutes. This idea works great if you are putting curtains that belonged in another room or house onto a new window and they just don't fit. Just my own little recommendation though, try not to put the ribbon directly in the middle, put it in a more eye pleasing area, such as in the bottom or top third.
Here's the window that I had to cover right away and didn't have the time to make them longer like I did in the bedroom (ugh, it bugs me every time I look at it)
See how its right above the window? Eww! And then I realized that the white curtains I had up were possibly see through at night. So, I put brown ones on top of the white, and whenever I feel like it, I change it to this:
It gives me a little variety. When I get a chance, I'll but something up above it so there isn't a huge empty spot.
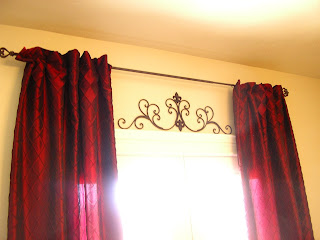
Now, Ikea curtains can't work everywhere. So, I went to the fabric store (I spend a lot of time there as you will soon find out) and found perfect fabric for our dining room, on sale of course! It was discounted to like $7 a yard. I needed 7 yards, so it was like $50. As I said, I like the quick fix (although it took me like 2 months to get these up), so don't look at the seams because they aren't sewn but who could tell? No one so far :)
I put these up by folding back the top 5" of the fabric and connecting the middle folded over section with cafe curtain clasps then slid them onto the rod. (I saw that Sarah at thrifty decor chick did the same thing here) . I hate all french door window covering ideas that I have ever found. I don't like the idea up putting the curtains directly on windows in the hour-glass figure shape, I'm also not a fan of putting blinds on my door (although my husband may win on that one and get his way). So, for my solution, I put up normal curtains right under the ceiling and hung this iron piece. I think it looks great. It makes the door look so much more grand than it did before:
I'll post more curtain ideas soon :)
Read More